Creating States for an Actor
What is a state?
A state represents a specific group of actions that should be performed while an actor’s specific condition is met.
The usage strategy
After being correctly crafted, a State script should be attached to the same GameObject as the StateMachine. The machine will then automatically recognize it and use it as it should.
Also, the State class, as the Actor class, is abstract. It is so because a state is specific for an specific actor. Being that way, it does not make any sense to a state to exist without knowing its reason for being.
The code
Below is the base code for a successful state. Take a look at it and feel free to copy and use it as you wish.
using System;
using System.Collections;
using System.Collections.Generic;
using UnityEngine;
using Handy2DTools.Actions;

public class MySpecialState : State
{

   #region State Methods

   public void OnLoad()
   {
      // Register your transitions here
   }

   public void OnEnter()
   {
      // Executed at the same frame actor enters this state
   }

   public void OnExit()
   {
      // Executed at the same frame actor exits this state
   }

   public void Tick()
   {
      // Actor's Update()
   }

   public void LateTick()
   {
      // Actor's LateUpdate()
   }

   public void FixedTick()
   {
      // Actor's FixedUpdate()
   }

   #endregion
}
And, of course, there is a Script Template ready for you at Create -> Handy 2D Tools -> FSM -> New State.
Ok. Now that we’ve seen the code, let’s take a deep dive into each of those methods. All these methods are optional and you only need to implement the ones you will use inside your state.
OnLoad()
This method represents the moment a StateMachine loads this State script into its handled states. So it is inside
the State.OnLoad() that you should put any logic regardind initialization before the machine starts running.
// Some other code

Func<bool> Falling => () => actor.rigidBody2D.velocity.y < 0;

public void OnLoad()
{
   // Register transitions and stuff
   AddTransition(Falling, GetComponent<FallingState>());
}

// Some other code
The State.OnLoad() is the best place to register transitions. Wich we will cover on the
Transitioning Between States section.
This method is called only once in the StateMachine life cycle.
OnEnter()
This method is called the exact moment a StateMachine sets this State script as its current state.
// Some other code

public void OnEnter()
{
   actor.animator.SetBool("isWalking", true);
}

// Some other code
The State.OnEnter() is perfect for start playing animations, initializing variables, properties and etc.
OnExit()
This method is called right before a StateMachine wich has this State script as its current state, transition into another state.
// Some other code

public void OnExit()
{
   actor.animator.SetBool("isWalking", false);
}

// Some other code
The State.OnExit() is perfect place to stop animations and reset variables, properties and etc.
Tickers
Once a State is defined as current state by the machine, its “Ticker methods” will be called at each time its actor “frame handlers” are executed.
They are:
Tick(): Called every time the actor Update() method is called.LateTick(): Called every time the actor LateUpdate() method is called.FixedTick(): Called every time the actor FixedUpdate() method is called.
// Some other code

float xSpeed = 10.0f;
float xInput;

public void Tick()
{
   xInput = Input.GetAxis("Horizontal");
}

public void FixedTick()
{
   actor.rigidBody2D.velocity = new Vector2(xInput * xSpeed, actor.rigidBody2D.velocity.y);
}

public void LateTick()
{
   if (xInput != 0) {
      actor.camera.ZoomIn();
   }
   else {
      actor.camera.ZoomOut();
   }
}

// Some other code
Hint
If you are not familiar with the LateUpdate() method, it is called once per frame after the Update() as a way to organize your script execution.
Refer to the Handy 2D Tools FSM Life Cycle for visual information about Tickers being called.
Transitioning Between States
There are two ways for a state to transition into another state:
By calling the Machine’s
ChangeState()method.
Note
As seen on the State Documentation, all the states hold reference to the Machine they belong to. Therefore, accessing
the machine’s methods from within a state is as easy as using its State.machine property as we can see below.
// Some other code

public void FixedTick()
{

     if (somethingWeirdHappened)
     {
        State newState = GetComponent<OtherState>();
        machine.ChangeState(newState);
     }

}

// Some other code
By registering a StateTransition inside its
State.OnLoad()using theState.AddTransition()method.
Using this approach (wich is highly recommended) the machine will, at each of the “frame handlers”, evaluate if any condition is met considering given priorities. If so, it will automatically transition into the target state.
A StateTransition consists in a Condition, a target State and a priotity level. But there is no need for
you to instantiate it. Just call the State.AddTransition() method and pass the those 3 arguments. I take care of the rest for you. Here is how
you use it:
Func<bool> Condition => () => something > anotherThing;
State someState = GetComponent<SomeState>();
int priority = 1;

AddTransition(Condition, someState, priority);
But, if you somehow prefer, here is how a StateTransition is instantiated and registered:
Func<bool> Condition => () => something > anotherThing;
State someState = GetComponent<SomeState>();
int priority = 1;

StateTransition transition = new StateTransition(Condition, someState, priority);
AddTransition(transition);
Note that to declare a Condition you MUST approach using a
Func<TResult> Delegate. Do not worry if you are not
familiar with this yet. All you need to know is that the machine will call this as a method (function) and its context will be
evaluated as true or false only when the machine do so. In case this represents news for you, for now,
just follow the syntax in the code below each time you want to register a StateTransition in a state.
To declare the target state, since all states are components attached to the same GameObject, you can just use the GetComponent<State>() method.
At last, priority for the machine is read descending. Wich means the higher the integer you give as third argument, sooner its condition will be evaluated.
otherwise it will be read as the declaration order. The default priority value is 0.
// Some other code

// Example of conditions using delegate functions and recurring to lambda functions
// IMPORTANT!! It MUST be a delegate function. Check the docs for further understanding
protected Func<bool> Idle => () => actor.rigidBody2D.velociy.x == 0; // Here we take advantage on lambda functions so we do not need to declare a method.
protected Func<bool> Moving => () => actor.rigidBody2D.velociy.x != 0;

// Called to set the state able to be used by the Machine.
// Usually where you should register state transitions.
public void OnLoad()
{
    // Example of how to add transitions
    AddTransition(Idle, GetComponent<MovingState>()); // No priority means priority = 0
    AddTransition(Moving, GetComponent<MovingState>(), 1); // Setting higher priority on third argument for this one. It will be executed before.
}

// Some other code
Note
The State.OnLoad() is called only once on the Machine’s life cycle. Meaning that any GetComponent<State>()
(or, well… anything else) used inside of it will not be called multiple times.
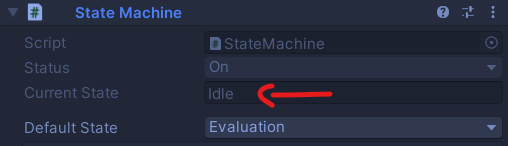
The inspector
For a simple state, a simple name. Just that. You can set a Name for your state using Unity’s inspector so you get some better visual feedback when taking a look at the state machine.
Set a name:

And see it in action while inpecting the StateMachine:
That is it about creating a state for now. Let me show you a little about how to use our precious state machine.